BERT介绍及中文文本相似度任务实践
Hi,大家好,我是编程小6,很荣幸遇见你,我把这些年在开发过程中遇到的问题或想法写出来,今天说一说BERT介绍及中文文本相似度任务实践,希望能够帮助你!!!。
本文内容列表
- BERT简介
- BERT源码分析
-
- 1、从git上克隆代码
- 2、下载预训练模型
- 3、代码结构
- 4、 run_classifier.py文件(中文文本相似度任务fine-tuning)
-
- 1. 自定义数据类
- 2. 增加自定义类
- 3. 函数调用参数
- 4. 训练模型
- 5. 总结
- 附代码
BERT简介
BERT全称 Bidirectional Encoder Representations from Transformers,是一种新的语言模型。自Google在2018年10月底公布BERT在11项NLP任务中的卓越表现后,BERT引起了社区极大的关注与讨论,被认为是 NLP 领域的极大突破。
BERT是一种预训练语言表示的方法,在大量文本语料上训练了一个通用的“语言理解”模型,然后用这个模型去执行各类下游子任务。它是第一个用在预训练NLP上的无监督、深度双向系统。
Google已开放源码,并提供了预训练模型的下载地址,这些模型已经在大规模数据集上进行了预训练。
git地址: google-research/bert
当然
git上还有其他版本的实现,可自行百度。
关于BERT的理论部分,可参照其他博客,该文后面主要对BERT的上手实践进行记录。。
BERT源码分析
1、从git上克隆代码
使用如下命令:
git clone https://github.com/google-research/bert
2、下载预训练模型
git上给出了以下预训练模型,可根据需要进行下载:
- BERT-Large, Uncased(Whole Word Masking):24-layer, 1024-hidden, 16-heads, 340M parameters
- BERT-Large, Cased (Whole Word Masking: 24-layer, 1024-hidden, 16-heads, 340M parameters
- BERT-Base, Uncased: 12-layer, 768-hidden, 12-heads, 110M parameters
- BERT-Large, Uncased24-layer, 1024-hidden, 16-heads, 340M parameters
- BERT-Base, Cased:12-layer, 768-hidden, 12-heads , 110M parameters
- BERT-Large, Cased: 24-layer, 1024-hidden, 16-heads, 340M parameters
- BERT-Base, Multilingual Cased (New, recommended): 104 languages, 12-layer, 768-hidden, 12-heads, 110M parameters
- BERT-Base, Multilingual Uncased (Orig, not recommended) (Not recommended, use Multilingual Cased instead): 102 languages, 12-layer, 768-hidden, 12-heads, 110M parameters
- BERT-Base, Chinese: Chinese Simplified and Traditional, 12-layer, 768-hidden, 12-heads, 110M parameters
其中,最后一个是针对中文的预训练模型。
由于接下来的工作是对中文进行处理,因此下载最后一个模型,文件名为 chinese_L-12_H-768_A-12.zip。将其解压至bert文件夹,包含以下三种文件:
- 配置文件(bert_config.json):用于指定模型的超参数
- 词典文件(vocab.txt):用于WordPiece 到 Word id的映射
- Tensorflow checkpoint(bert_model.ckpt):包含了预训练模型的权重(实际包含三个文件)
3、代码结构
BERT的本质上是一个两段式的NLP模型。第一阶段:Pre-training,利用无标记的语料训练一个语言模型;第二阶段:Fine-tuning,利用预训练好的语言模型,完成具体的NLP下游任务。
我们在下载的预训练模型的基础上,进行
Fine-tuning,因此着重介绍微调的代码使用。
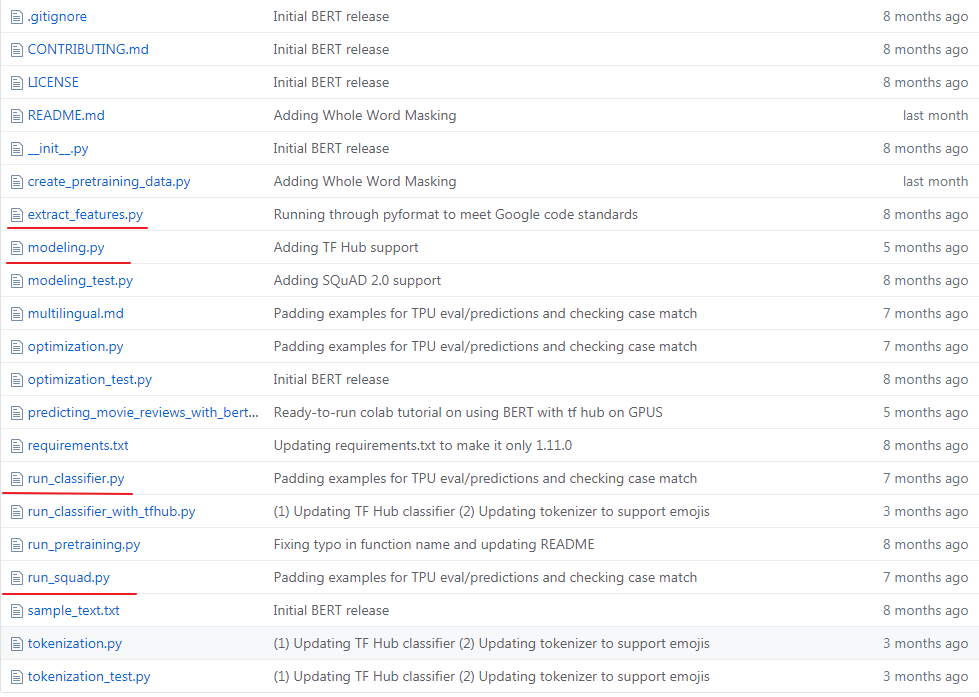
下图是bert的源码结构:
其中, run_classifier.py和run_squad.py这两个文件是用来做fine-tuning的。
extract_features.py文件从名称来看可知是用来提取特征向量的,后面文章再具体介绍。
4、 run_classifier.py文件(中文文本相似度任务fine-tuning)
接下来,以 中文文本相似度 任务为例,介绍进行
fine-tuning的流程。
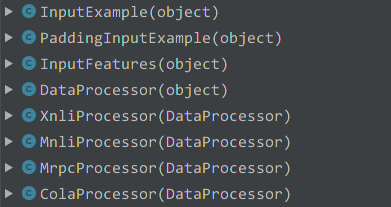
打开run_classifier.py文件,查看其文件结构,可以如下看到几个类,下图是run_classifier.py文件中所包含的几个数据处理类:
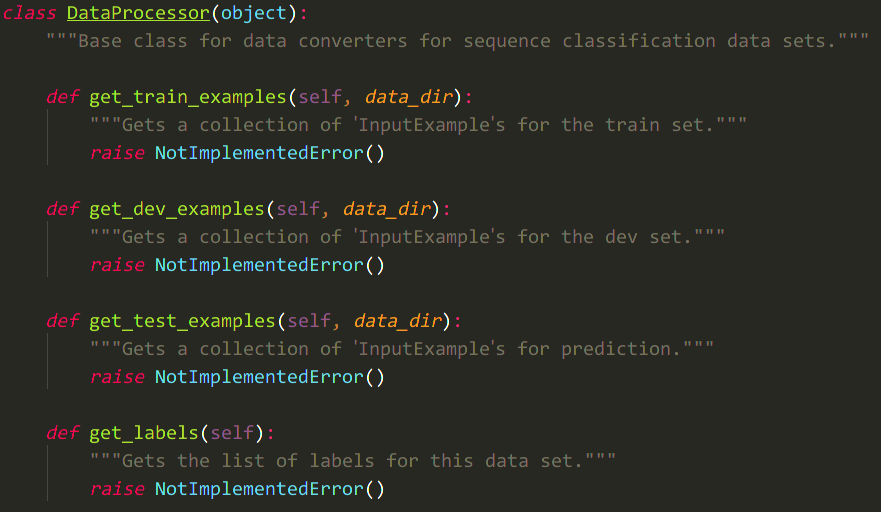
其中,几个****Processor的类,都继承于同一个父类DataProcessor(object),该父类提供了 4 个抽象方法,如下图:
由名称我们可知:前三个方法是获取 训练、验证、测试的输入数据,第四个方法是获取labels。
对于我们处理自己的数据,就需要自定义新的数据类,并重写这四个方法,从而实现数据的获取过程。
1. 自定义数据类
具体的实现方法可以参考其他几个类的实现过程。
现有类分析
假设我们数据类取名为SimProcessor,具体如何实现4个方法呢,我们不妨来看看其中一个数据类,如XnliProcessor,以get_train_examples()函数和get_labels()函数为例分析:
def get_train_examples(self, data_dir): # 获取训练数据
    """See base class."""
    lines = self._read_tsv(
        os.path.join(data_dir, "multinli",
                     "multinli.train.%s.tsv" % self.language)) # 读取训练文件,后缀为.tsv
    examples = [] # 空列表
    for (i, line) in enumerate(lines): # 逐行读取
        if i == 0:
            continue
        guid = "train-%d" % (i)
        text_a = tokenization.convert_to_unicode(line[0]) # 句子A
        text_b = tokenization.convert_to_unicode(line[1]) # 句子B
        label = tokenization.convert_to_unicode(line[2]) # label
        if label == tokenization.convert_to_unicode("contradictory"):
            label = tokenization.convert_to_unicode("contradiction")
        examples.append(
            InputExample(guid=guid, text_a=text_a, text_b=text_b, label=label))
        # 最后将输入数据封装到 InputExample的对象中,并添加到list中,返回
    return examples

def get_labels(self):
    """See base class."""
    return ["contradiction", "entailment", "neutral"] # 标签信息
由上述代码可知,读取数据集的基本流程为:
1. 读取.tsv格式的训练数据集文件(也可是其他格式的文件,只要与读取代码匹配即可)
2. 逐行读取,并提取出句子A,句子B和label信息
3. 将上述数据封装到名为InputExample的对象中,并添加到list中
4. 返回该list
注意:读取的每行信息
line的下标内容取决于.tsv数据集文件中的数据形式(顺序)
get_labels()函数中,用于设定标签内容,文本相似度计算是二分类问题,因此将label设定为["0", "1"]
注意:
get_labels方法返回的是一个数组,因为相似度问题可理解为二分类,返回标签是0和1。
注意:这里返回的是字符串。
自定义类
SimProcessor类的部分实现代码如下(仅供参考):
使用的.csv格式的文件,每行内容为: 0,句子A,句子B,因此label在索引为0的位置,label = str(line[0])
class SimProcessor(DataProcessor):
    def get_train_examples(self, data_dir):
        """See base class."""
        file_path = os.path.join(data_dir, 'train.csv') # 数据格式举例:0,句子A,句子B
        examples = []
        with open(file_path, encoding='utf-8') as f: # 使用open函数读取文件
            reader = f.readlines()
        for (i, line) in enumerate(reader):
            guid = "train-%d" % (i)
            split_line = line.strip().split(",") # 根据逗号分隔
            text_a = tokenization.convert_to_unicode(line[1])
            text_b = tokenization.convert_to_unicode(line[2])
            label = str(line[0])
            examples.append(
                InputExample(guid=guid, text_a=text_a, text_b=text_b, label=label))
        return examples
小说明
tsv格式:Tab-separated values的缩写,即制表符分隔值csv格式:Comma-separated values的缩写,逗号分隔符,更常见一些。Python中可以使用csv模块来实现该格式的读写。
2. 增加自定义类
定义完
SimProcessor类之后,还需要将其加入到main函数中的processors变量中去。
找到main()函数,增加新定义数据类,如下所示:
def main(_):
    tf.logging.set_verbosity(tf.logging.INFO)

    processors = {

        "cola": ColaProcessor,
        "mnli": MnliProcessor,
        "mrpc": MrpcProcessor,
        "xnli": XnliProcessor,
        "sim": SimProcessor, #新增该项
    }
3. 函数调用参数
查看函数执行入口,可发现必须调用如下参数,这5个参数是必填参数:
if __name__ == "__main__":
    flags.mark_flag_as_required("data_dir")
    flags.mark_flag_as_required("task_name")
    flags.mark_flag_as_required("vocab_file")
    flags.mark_flag_as_required("bert_config_file")
    flags.mark_flag_as_required("output_dir")
    tf.app.run()
每个参数的含义如下:
| 参数 | 说明 |
|---|---|
data_dir |
数据存放地址 |
task_mask |
processor的名字 |
vocab_file |
字典文件的地址 |
bert_config_file |
配置文件 |
output_dir |
模型输出地址 |
其他参数可到run_classifier.py文件的最开始位置查看,部分参数如下:
# Other parameters

flags.DEFINE_string(
    "init_checkpoint", None,
    "Initial checkpoint (usually from a pre-trained BERT model).")

flags.DEFINE_bool(
    "do_lower_case", True,
    "Whether to lower case the input text. Should be True for uncased "
    "models and False for cased models.")

flags.DEFINE_integer(
    "max_seq_length", 128,
    "The maximum total input sequence length after WordPiece tokenization. "
    "Sequences longer than this will be truncated, and sequences shorter "
    "than this will be padded.")

flags.DEFINE_bool("do_train", False, "Whether to run training.")

flags.DEFINE_bool("do_eval", False, "Whether to run eval on the dev set.")

flags.DEFINE_bool(
    "do_predict", False,
    "Whether to run the model in inference mode on the test set.")
4. 训练模型
配置完以上代码,接下来就可以训练模型了。
参考git上给出的示例,如下:
export BERT_BASE_DIR=/path/to/bert/uncased_L-12_H-768_A-12
export GLUE_DIR=/path/to/glue

python run_classifier.py \
  --task_name=MRPC \
  --do_train=true \
  --do_eval=true \
  --data_dir=$GLUE_DIR/MRPC \
  --vocab_file=$BERT_BASE_DIR/vocab.txt \
  --bert_config_file=$BERT_BASE_DIR/bert_config.json \
  --init_checkpoint=$BERT_BASE_DIR/bert_model.ckpt \
  --max_seq_length=128 \
  --train_batch_size=32 \
  --learning_rate=2e-5 \
  --num_train_epochs=3.0 \
  --output_dir=/tmp/mrpc_output/
由于参数较多,修改参数后,将其保存至.sh文件中,方便执行。
修改后示例如下:
#!/usr/bin/env bash
export BERT_BASE_DIR=/**/NLP/bert/chinese_L-12_H-768_A-12 #全局变量 下载的预训练bert地址
export MY_DATASET=/**/NLP/bert/data #全局变量 数据集所在地址

python run_classifier.py \
  --task_name=sim  \
  --do_train=true \
  --do_eval=true \
  --do_predict=true \
  --data_dir=$MY_DATASET \
  --vocab_file=$BERT_BASE_DIR/vocab.txt \
  --bert_config_file=$BERT_BASE_DIR/bert_config.json \
  --init_checkpoint=$BERT_BASE_DIR/bert_model.ckpt \
  --max_seq_length=128  \
  --train_batch_size=32 \
  --learning_rate=5e-5 \
  --num_train_epochs=2.0 \
  --output_dir=./sim_output/
将数据放入data_dir目录下,测试完成后,在output_dir文件夹下会生成训练好的模型文件,test_result.tsv文件。如下
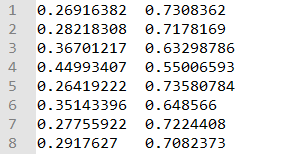
test_result.tsv文件内容如下:
维度N*2,N表示测试样本数量,2列分别表示测试样本属于label的概率值,即第一列为两个句子为0的概率,第二列为两个句子为1的概率。
5. 总结
- 下载预训练模型,解压
- 准备训练数据,包括训练集、验证集和测试集,分别保存至
.tsv或.csv文件中 - 在
run_classifier.py文件中新增数据处理类xxxProcessor(),内部实现其父类DataProcessor的四个子方法 - 在
run_classifier.py文件中的main函数中增加该数据类 - 设置训练参数,运行
run_classifier.py函数,获取结果。
附代码
- 将
run_classfifer.py文件中修改的代码部分贴在此处。- 以中文文本相似度为例,相当于二分类
# 增加数据处理类, 可放置在class ColaProcessor(DataProcessor)类后面。
class SimProcessor(DataProcessor):
    def get_train_examples(self, data_dir):
        """See base class."""
        file_path = os.path.join(data_dir, 'train.csv')
        examples = []
        with open(file_path, encoding='utf-8') as f:
            reader = f.readlines()
        for (i, line) in enumerate(reader):
            guid = "train-%d" % (i)
            split_line = line.strip().split(",")
            text_a = tokenization.convert_to_unicode(split_line [1])
            text_b = tokenization.convert_to_unicode(split_line [2])
            label = str(split_line [0])
            examples.append(
                InputExample(guid=guid, text_a=text_a, text_b=text_b, label=label))
        return examples

    def get_dev_examples(self, data_dir):
        """See base class."""
        file_path = os.path.join(data_dir, 'val.csv')
        examples = []
        with open(file_path, encoding='utf-8') as f:
            reader = f.readlines()
        for (i, line) in enumerate(reader):
            guid = "dev-%d" % (i)
            split_line = line.strip().split(",")
            text_a = tokenization.convert_to_unicode(split_line [1])
            text_b = tokenization.convert_to_unicode(split_line [2])
            label = str(line[0])
            examples.append(
                InputExample(guid=guid, text_a=text_a, text_b=text_b, label=label))
        return examples

    def get_test_examples(self, data_dir):
        """See base class."""
        file_path = os.path.join(data_dir, 'test.csv')
        examples = []
        with open(file_path, encoding='utf-8') as f:
            reader = f.readlines()
        for i, line in enumerate(reader):
            guid = "test-%d" % (i)
            split_line = line.strip().split(",")
            text_a = tokenization.convert_to_unicode(split_line[1])
            text_b = tokenization.convert_to_unicode(split_line[2])
            label = str(split_line[0])
            examples.append(
                InputExample(guid=guid, text_a=text_a, text_b=text_b, label=label))
        return examples

    def get_labels(self):
        """See base class."""
        return ["0", "1"]

# main函数中增加新定义的数据类
def main(_):
    tf.logging.set_verbosity(tf.logging.INFO)

    processors = {

        "cola": ColaProcessor,
        "mnli": MnliProcessor,
        "mrpc": MrpcProcessor,
        "xnli": XnliProcessor,
        "sim": SimProcessor, #增加此项
    }
执行训练命令,可直接运行上文中提到的.sh文件,命名为train_sim.sh。运行:
sh ./train_sim.sh
本文参考资料如下:
- BERT简介及中文分类
- 使用BERT做中文文本相似度计算与文本分类
- BERT中文实践
今天的分享到此就结束了,感谢您的阅读,如果确实帮到您,您可以动动手指转发给其他人。
上一篇
已是最后文章
下一篇
已是最新文章

