java之TreeNode「建议收藏」
Hi,大家好,我是编程小6,很荣幸遇见你,我把这些年在开发过程中遇到的问题或想法写出来,今天说一说java之TreeNode「建议收藏」,希望能够帮助你!!!。
~ 前言
之前讲的HashMap机制遗漏了一个Tree的操作,我们在这里补上。如果是从头看到这里那么这一章也会非常容易。
后续讲解内容为源码实现,这里使用的是JDK8的版本。
红黑树
HashMap使用的树结构是红黑树,而红黑树是一个平衡二叉树,节点都是按某种规则有序存储的,红黑树的特点就是有以下几点:
- 每个结点不是红色就是黑色
- 根节点是黑色的
- 如果一个结点是红色的,则它的两个孩子结点是黑色的(节点与孩子节点不能是两个红色,即一线不能有两红)
- 对于每个结点,从该结点到其所有后代叶结点的简单路径上,均包含相同数目的黑色结点
- 每个叶子结点都是黑色的(此处的叶子结点指的是空结点)
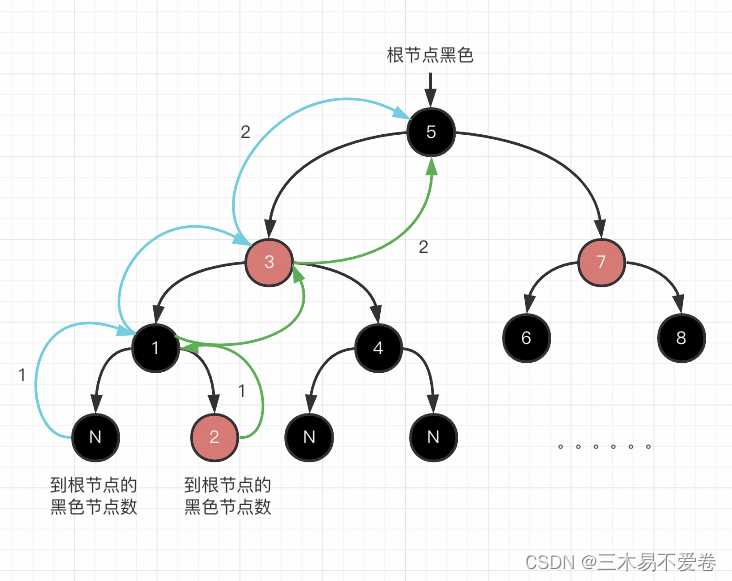
我们上面的图就是一个常见的红黑树结构,接下来我们根据图来理解一下规则。
第一点与第二点已经标注出来了
第三点我们可以看到节点3、7都是红色节点,而它的子节点都是黑色的
第四点我们使用了蓝色线与绿色线来算到根节点经过的黑色节点数,这里需要注意是叶子节点到根节点,或者根节点到叶子节点
第五点我们用了大写字母N来表示为空节点(NIL)
除了这些之外要注意的是插入的节点一定是红色
当然除了这些还有中序遍历、左旋、右旋、节点变色的概念,这些都超级复杂(指记住公式)需要记住一些公式。就像魔方一样我们有公式在某一个步骤使用一个公式就能回复一面颜色,数学的某一题使用一个公式就能解出结果一样,这些都是经过了研究与超多案例校验提取出来的稳定公式,我们只需要套用即可。
中序遍历
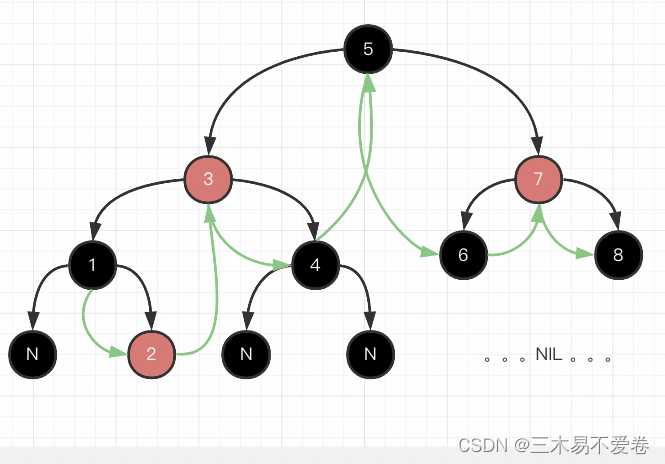
根据上面的图与简单介绍,我们知道了红黑树的有顺序的,那么我们要顺序遍历出每个节点应该怎么遍历呢?我们通过一个图来看一下,这里简单理解就可以了。
文字描述
从根节点开始遍历,所以当前处理节点就是跟节点,如果左边有节点不为空就先遍历左边节点 (递归)。
这是当前处理节点就是左边节点,再次判断是否有左边节点不为空,如果有就循环拿左边节点处理(递归)。
一直到左边节点为空,这时的当前节点就是开头最小的节点了。处理完左边节点之后,当前节点就是下一个值。
接下来查看当前节点的右边节点是否有内容,有就把当前节点设置为右节点(递归),然后根据上面步骤进行处理。
右边节点也到空了返回处理父节点了(递归)
左右旋转
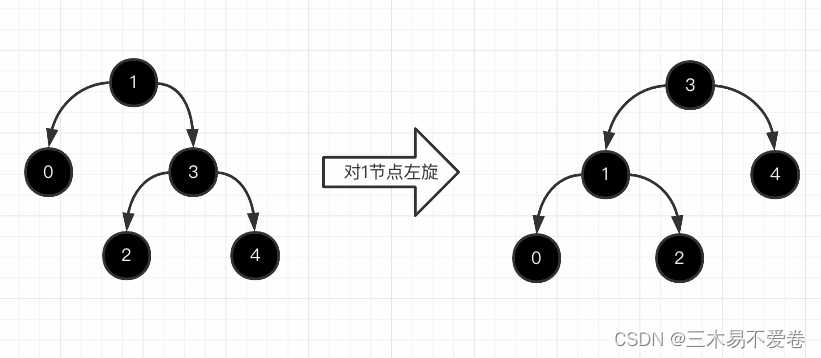
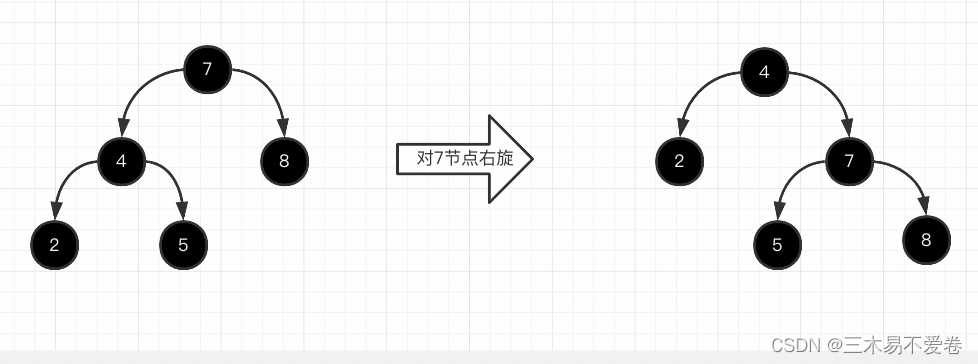
左右旋转与节点变色是对不符合红黑树规则进行调整的基础手段,节点变色如名称只要改一个属性就可以了,当时左右旋转是对一个子树的变化,接下来我们分两种情况看一下是如何旋转的。
上面的图片就是左旋操作,文字描述
当前节点是1,将右边节点3的左边节点2赋值给当前节点1。
将右边节点3的左边节点赋值为当前节点1
并维护好各自的父节点值
上面的图片就是左旋操作,文字描述
当前节点是7,将左边节点4的右边节点5赋值给当前节点7的左边节点。
将左边节点4的右边节点赋值为当前节点7
并维护好各自的父节点值
插入维护与删除维护
上面看完了一些基本的红黑树操作之后我们就可以来看红黑树是怎么维护节点的。
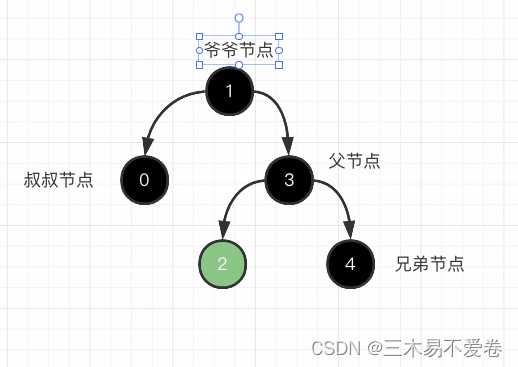
首先需要明确以上几个概念,接下来我们列举插入的几种情况分析:
- 当前节点插入是根节点位置 -> 当前节点为黑色
- 当前节点插入位置的父节点是黑色 -> 无冲突,不需要维护
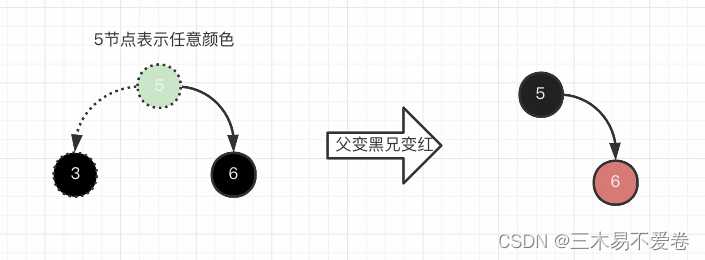
- 当前节点插入位置的父节点是红色 -> 冲突,需要维护
3.1 情况一、叔叔节点是红色
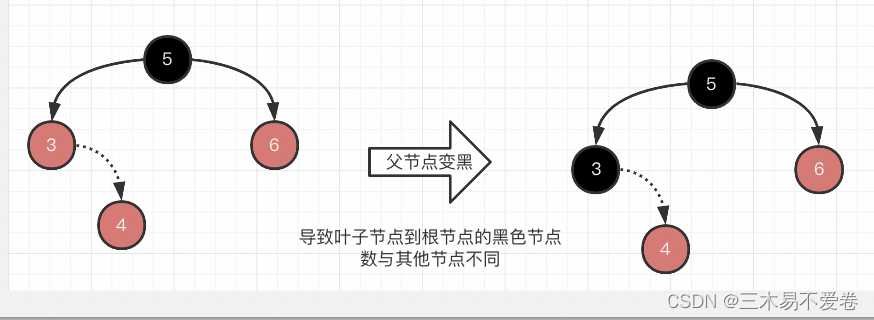
3.1.1 先将父节点变黑
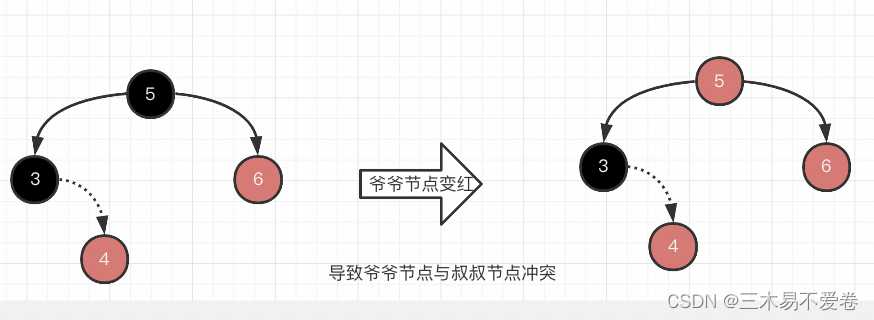
3.1.2 将爷爷节点变为红
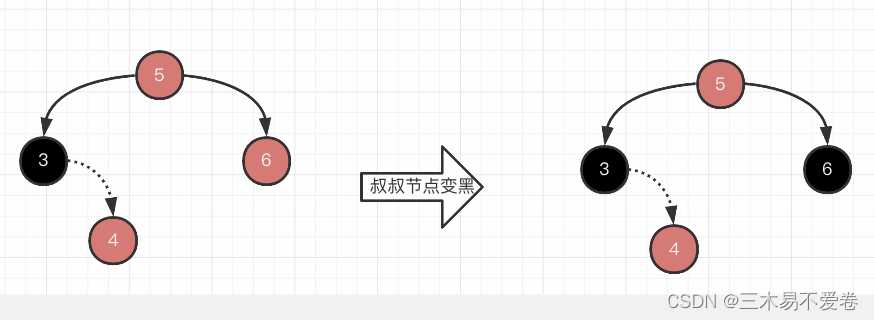
3.1.3 将叔叔节点变为黑
3.1.4 让爷爷节点为当前节点往上做判断
3.2 情况二、叔叔节点是黑色或为空
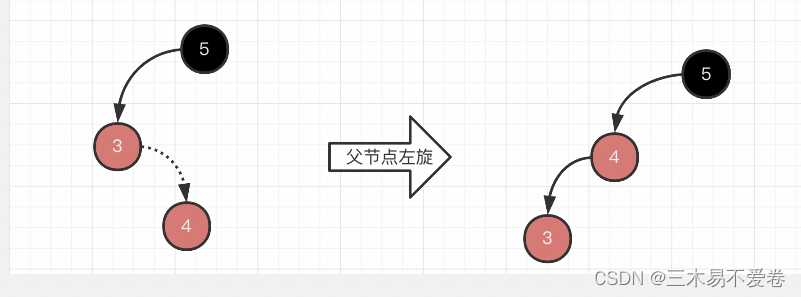
3.2.1 当前插入节点在父节点右边,并且双红冲突,这里是L(left)R(right)双红冲突,将它转换为LL双红冲突,那么当前节点就是节点3了
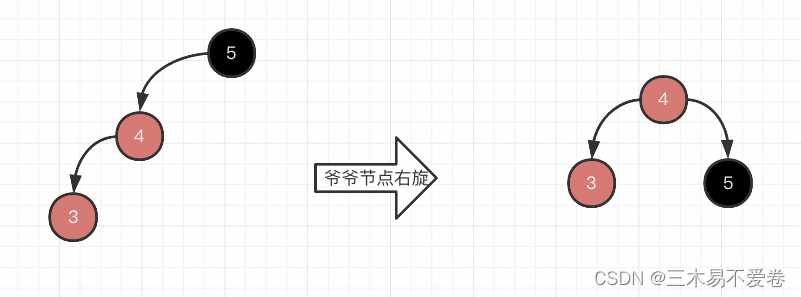
3.2.2 LR冲突或者LL冲突都进入这里。先让爷爷节点右旋
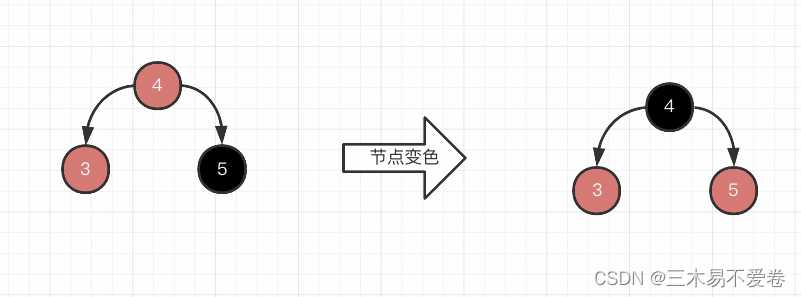
3.2.3 最后节点变色即可
插入的树维护到这里就看完了,接下来了删除维护,我们也分几种情况来分析:
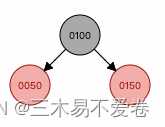
- 删除节点为叶子节点,且为红色(这里删除50)
- 删除节点为叶子节点,且为黑色,这里分几种情况,大家可以根据红黑树的性质判断删除后违反红黑树的哪几点规则。
2.1.兄弟节点B也为黑色,兄弟节点没有子节点。
2.2. 兄弟节点也为黑色,兄弟节点的左子节点为红色。
2.3. 兄弟节点也为黑色,兄弟节点的右子节点为红色。
2.4. 兄弟节点也为黑色,兄弟节点的左右子节点都为红色。
2.5. 兄弟节点为红色,兄弟节点的左右子节点都为黑色。
3. 删除节点只有左子节点,只有左子节点。
4. 删除节点只有左子节点,只有右子节点,与上面步骤三一样处理。
5. 删除节点有两个子节点。
到这里就讲完了维护红黑树的方式,是不是感觉非常麻烦的!这里可以感受到我们很多东西都是站在巨人的肩膀上进行的,免去了我们很多的步骤,那么说回来这些我理解的方法不一定都是完美的,只要我们按从小到大的解决方式,可能大家能找到更好的解决方法!
这里给大家找了一篇红黑树删除节点后维护的文章,其实我写完这一段觉得描述不太完美并且不够清晰的,可能是文笔有限吧。所以找了一篇我认为非常详细且容易理解的文章给大家!枫铃树的红黑树详解(下)
最后这里有一个网站推荐给大家,可以自己试一下动态添加删除节点时红黑树是怎样维护的。红黑树
TreeNode
在看源码之前我们来思考一下,我们之前学过数组与链表的数据结构,那么树和这两个比有什么特点呢?有什么优势呢?
首先我们对比数组与链表可以知道,数组插入麻烦但是查找非常快,而链表插入很简单但查找非常慢。那么树呢?树是链表的变体实现,所以插入很快,那么为了克服查找慢的问题就引入了二分查找法的实现,把每个节点都分成两半,这样每次查找都能快速丢弃不需要查找的那一半。所以它的查找速度也是非常快的。
ok,那进入源码环节,先来看看TreeNode中定义的成员。
// 父节点
TreeNode<K,V> parent;

// 左边节点
TreeNode<K,V> left;

// 右边节点
TreeNode<K,V> right;

// 上一个节点
TreeNode<K,V> prev;

// 红黑节点
boolean red;
可以简单的看出是一个树的结构了,接下来我们回顾一下树化的条件: table某个插槽长度达到阈值(8)就进行树化,但是这样描述就是准确的了吗?
// tab就是存储的那个表格
// hash为当前插入插槽的hash
final void treeifyBin(Node<K,V>[] tab, int hash) {

       int n, index; Node<K,V> e;

		// 如果tab为空 或者 table的个数小于这个常量值就直接扩容不进行树化
		// static final int MIN_TREEIFY_CAPACITY = 64
       if (tab == null || (n = tab.length) < MIN_TREEIFY_CAPACITY)
           resize();

		// 拿到需要树化的那个插槽,转换为树节点然后进行树化操作。
       else if ((e = tab[index = (n - 1) & hash]) != null) {

           TreeNode<K,V> hd = null, tl = null;
           do {

               TreeNode<K,V> p = replacementTreeNode(e, null);
               if (tl == null)
                   hd = p;
               else {

                   p.prev = tl;
                   tl.next = p;
               }
               tl = p;
           } while ((e = e.next) != null);
           if ((tab[index] = hd) != null)
               hd.treeify(tab);
       }
   }
看来我们这里树化的条件处理插槽的长度大于等于阈值(8)之外,table的长度还要大于等于另一个阈值(64)。
左旋右旋
// pp pp
// | |
// p r
// / \ -> / \
// l r p rr
// / \ / \
// rl rr l rl
static <K,V> TreeNode<K,V> rotateLeft(TreeNode<K,V> root,
                                              TreeNode<K,V> p) {


	// p 是要旋转的节点
	// root 根节点
    TreeNode<K,V> r, pp, rl;

	// 拿到需要旋转后做父亲的节点
    if (p != null && (r = p.right) != null) {


		// 右节点的左节点旋转后变为当前节点的右边节点 p->rl
        if ((rl = p.right = r.left) != null)
            rl.parent = p;

		// 旋转后p节点变为r节点的左子节点,那么r节点就是父节点,维护r与p节点父节点的关系
		// 如果p的父节点是根节点,说明旋转后r节点就是根节点
        if ((pp = r.parent = p.parent) == null)
            (root = r).red = false;

		// 不是根节点就确定是在爷爷节点的左边还是右边进行赋值维护父子关系
        else if (pp.left == p)
            pp.left = r;
        else
            pp.right = r;

		// 维护指针关系
        r.left = p;
        p.parent = r;
    }
    return root;
}
上面的代码就是左旋转的代码了,结合注释与旋转后的结果图对比看源码十分简单。
// pp pp
// | |
// p l
// / \ -> / \
// l r ll p
// / \ / \
// ll lr lr r
static <K,V> TreeNode<K,V> rotateRight(TreeNode<K,V> root,
                                               TreeNode<K,V> p) {


	// p 是要旋转的节点
	// root 根节点
    TreeNode<K,V> l, pp, lr;

	// 拿到需要旋转后做父亲的节点
    if (p != null && (l = p.left) != null) {


		// 左节点的右节点旋转后变为当前节点的左边节点 p->lr
        if ((lr = p.left = l.right) != null)
            lr.parent = p;

		// 旋转后p节点变为l节点的右子节点,那么l节点就是父节点,维护l与p节点父节点的关系
		// 如果p的父节点是根节点,说明旋转后l节点就是根节点
        if ((pp = l.parent = p.parent) == null)
            (root = l).red = false;

		// 不是根节点就确定是在爷爷节点的左边还是右边进行赋值维护父子关系
        else if (pp.right == p)
            pp.right = l;
        else
            pp.left = l;

		// 维护指针关系
        l.right = p;
        p.parent = l;
    }
    return root;
}
看完左旋转再看右旋转的代码就是反过来而已,结合注释与旋转后的结果图对比看源码十分简单。
插入与删除维护树操作
static <K,V> TreeNode<K,V> balanceInsertion(TreeNode<K,V> root,
                                                    TreeNode<K,V> x) {


	// 插入的节点一定是红色的
    x.red = true;

    for (TreeNode<K,V> xp, xpp, xppl, xppr;;) {


		// 插入节点的父节点是空,那么插入节点就是根节点
		// 根节点一定是黑色
        if ((xp = x.parent) == null) {

            x.red = false;
            return x;
        }

		// 插入的节点的父节点是根节点
        else if (!xp.red || (xpp = xp.parent) == null)
            return root;

		// 插入节点的父节点在爷爷节点的左边
        if (xp == (xppl = xpp.left)) {


			// 叔叔节点不为空并且是红色
			// 叔叔节点变黑,父节点变黑,爷爷节点变红,当前节点为爷爷节点进入下一次处理
            if ((xppr = xpp.right) != null && xppr.red) {

                xppr.red = false;
                xp.red = false;
                xpp.red = true;
                x = xpp;
            }

			// 叔叔节点是空或者黑色
            else {


				// 当前节点插在父节点右边,左旋父节点,当前节点变为父节点
                if (x == xp.right) {

                    root = rotateLeft(root, x = xp);
                    xpp = (xp = x.parent) == null ? null : xp.parent;
                }

				// 父节点不为空
				// 父节点变黑,爷爷节点变红,然后做右旋
                if (xp != null) {

                    xp.red = false;
                    if (xpp != null) {

                        xpp.red = true;
                        root = rotateRight(root, xpp);
                    }
                }
            }
        }

		// 插入节点的父节点在爷爷节点的右边
		// 和上面的基本相同就是要反过来
        else {

            if (xppl != null && xppl.red) {

                xppl.red = false;
                xp.red = false;
                xpp.red = true;
                x = xpp;
            }
            else {

                if (x == xp.left) {

                    root = rotateRight(root, x = xp);
                    xpp = (xp = x.parent) == null ? null : xp.parent;
                }
                if (xp != null) {

                    xp.red = false;
                    if (xpp != null) {

                        xpp.red = true;
                        root = rotateLeft(root, xpp);
                    }
                }
            }
        }
    }
}
static <K,V> TreeNode<K,V> balanceDeletion(TreeNode<K,V> root,
                                                   TreeNode<K,V> x) {

 for (TreeNode<K,V> xp, xpl, xpr;;) {


		// 节点就是根
        if (x == null || x == root)
            return root;

		// 删除后x父节点为空,说明x为根节点,x置为黑色,红黑树平衡
        else if ((xp = x.parent) == null) {

            x.red = false;
            return x;
        }
        // 替换节点是红色说明删除节点是黑的,这里替换节点改黑就可以了。
        else if (x.red) {

            x.red = false;
            return root;
        }

		// 替代节点在左边
        else if ((xpl = xp.left) == x) {


			// 存在兄弟节点并且为红色
            if ((xpr = xp.right) != null && xpr.red) {


				// 兄弟节点变黑,父节点变红。
                xpr.red = false;
                xp.red = true;
                root = rotateLeft(root, xp);
                xpr = (xp = x.parent) == null ? null : xp.right;
            }

			// 没有兄弟节点
            if (xpr == null)

            	// 让当前节点为父节点,父节点做平衡。
                x = xp;
            else {


				// 兄弟节点有子节点为黑色,或者没有子节点
                TreeNode<K,V> sl = xpr.left, sr = xpr.right;
                if ((sr == null || !sr.red) &&
                    (sl == null || !sl.red)) {


                    // 兄弟节点为红色,当前节点为父节点
                    xpr.red = true;
                    x = xp;
                }

                // 兄弟节点的子节点一定有一个红色节点
                else {


					// 兄弟节点中右子节点为空或者为黑色
                    if (sr == null || !sr.red) {


						// 左子节点不为空,红色
                        if (sl != null)

							// 调整为黑
                            sl.red = false;

						// 兄弟节点变红,右旋,兄弟节点重新指向
                        xpr.red = true;
                        root = rotateRight(root, xpr);
                        xpr = (xp = x.parent) == null ?
                            null : xp.right;
                    }

					// 兄弟节点节点不为空
                    if (xpr != null) {


						// 兄弟节点变为父节点颜色
                        xpr.red = (xp == null) ? false : xp.red;
                        if ((sr = xpr.right) != null)
                            sr.red = false;
                    }

					// 父节点不为空就变黑色,左旋。
                    if (xp != null) {

                        xp.red = false;
                        root = rotateLeft(root, xp);
                    }
                    x = root;
                }
            }
        }

		// 在右边,与上面反过来看就行。
        else {

            if (xpl != null && xpl.red) {

                xpl.red = false;
                xp.red = true;
                root = rotateRight(root, xp);
                xpl = (xp = x.parent) == null ? null : xp.left;
            }
            if (xpl == null)
                x = xp;
            else {

                TreeNode<K,V> sl = xpl.left, sr = xpl.right;
                if ((sl == null || !sl.red) &&
                    (sr == null || !sr.red)) {

                    xpl.red = true;
                    x = xp;
                }
                else {

                    if (sl == null || !sl.red) {

                        if (sr != null)
                            sr.red = false;
                        xpl.red = true;
                        root = rotateLeft(root, xpl);
                        xpl = (xp = x.parent) == null ?
                            null : xp.left;
                    }
                    if (xpl != null) {

                        xpl.red = (xp == null) ? false : xp.red;
                        if ((sl = xpl.left) != null)
                            sl.red = false;
                    }
                    if (xp != null) {

                        xp.red = false;
                        root = rotateRight(root, xp);
                    }
                    x = root;
                }
            }
        }
    }
}
删除节点维护树这个比较难一点会往上处理,所以需要先掌握红黑树的维护再来看代码。
树化与解除树化
final void treeify(Node<K,V>[] tab) {

    TreeNode<K,V> root = null;

	// 从头遍历链表树节点
    for (TreeNode<K,V> x = this, next; x != null; x = next) {

        next = (TreeNode<K,V>)x.next;
        x.left = x.right = null;

		// 当前是头节点
        if (root == null) {

            x.parent = null;
            x.red = false;
            root = x;
        }
        else {

            K k = x.key;
            int h = x.hash;
            Class<?> kc = null;

			// 从根节点开始检测当前放左边还是右边,到找到位置为止。
            for (TreeNode<K,V> p = root;;) {

                int dir, ph;
                K pk = p.key;

				// 根据条件判断左边(dir=-1)还是右边(dir=1)
                if ((ph = p.hash) > h)
                    dir = -1;
                else if (ph < h)
                    dir = 1;
                else if ((kc == null &&
                          (kc = comparableClassFor(k)) == null) ||
                         (dir = compareComparables(kc, k, pk)) == 0)
                    dir = tieBreakOrder(k, pk);

                TreeNode<K,V> xp = p;

                // 获得插入位置不为空说明当前已经有节点了进入下一次,为空就插入
                if ((p = (dir <= 0) ? p.left : p.right) == null) {


					// 插入节点指针维护
                    x.parent = xp;
                    if (dir <= 0)
                        xp.left = x;
                    else
                        xp.right = x;

					// 维护红黑树与颜色
                    root = balanceInsertion(root, x);
                    break;
                }
            }
        }
    }

	// 将树化后的根节点放在插槽第一个
    moveRootToFront(tab, root);
}
以上就是树化的代码了,里面有个比较重要的方法balanceInsertion(root, x);里面实现了插入维护红黑树的方法。
// 遍历节点组成链表返回头节点。
final Node<K,V> untreeify(HashMap<K,V> map) {

    Node<K,V> hd = null, tl = null;
    for (Node<K,V> q = this; q != null; q = q.next) {

        Node<K,V> p = map.replacementNode(q, null);
        if (tl == null)
            hd = p;
        else
            tl.next = p;
        tl = p;
    }
    return hd;
}
小case
插入与移除节点
	final TreeNode<K,V> putTreeVal(HashMap<K,V> map, Node<K,V>[] tab,
                                       int h, K k, V v) {

    Class<?> kc = null;
    boolean searched = false;

	// 获取根节点
    TreeNode<K,V> root = (parent != null) ? root() : this;

	// 从根节点遍历插入位置
    for (TreeNode<K,V> p = root;;) {

        int dir, ph; K pk;

		// 与节点比较查看往左边还是右边
        if ((ph = p.hash) > h)
            dir = -1;
        else if (ph < h)
            dir = 1;
        else if ((pk = p.key) == k || (k != null && k.equals(pk)))
            return p;
        else if ((kc == null &&
                  (kc = comparableClassFor(k)) == null) ||
                 (dir = compareComparables(kc, k, pk)) == 0) {

            if (!searched) {

                TreeNode<K,V> q, ch;
                searched = true;
                if (((ch = p.left) != null &&
                     (q = ch.find(h, k, kc)) != null) ||
                    ((ch = p.right) != null &&
                     (q = ch.find(h, k, kc)) != null))
                    return q;
            }
            dir = tieBreakOrder(k, pk);
        }

		// 找到位置来进行插入
        TreeNode<K,V> xp = p;
        if ((p = (dir <= 0) ? p.left : p.right) == null) {

            Node<K,V> xpn = xp.next;

			// 根据参数新建树节点
            TreeNode<K,V> x = map.newTreeNode(h, k, v, xpn);
            if (dir <= 0)
                xp.left = x;
            else
                xp.right = x;
            xp.next = x;
            x.parent = x.prev = xp;
            if (xpn != null)
                ((TreeNode<K,V>)xpn).prev = x;

			// 插入节点、维护树、根节点放到插槽第一个节点。
            moveRootToFront(tab, balanceInsertion(root, x));
            return null;
        }
    }
}
和树化的方法差不多,主要是前面操作理解后这里就会超级简单。
	final void removeTreeNode(HashMap<K,V> map, Node<K,V>[] tab,
                                  boolean movable) {

   int n;
    if (tab == null || (n = tab.length) == 0)
        return;
    int index = (n - 1) & hash;
    TreeNode<K,V> first = (TreeNode<K,V>)tab[index], root = first, rl;
    TreeNode<K,V> succ = (TreeNode<K,V>)next, pred = prev;

	// 删除的节点没有上一个节点,说明是根节点。
    if (pred == null)
        tab[index] = first = succ;

	// 移除节点
    else
        pred.next = succ;
    if (succ != null)
        succ.prev = pred;

	// 空
    if (first == null)
        return;

	// 获取根节点
    if (root.parent != null)
        root = root.root();
    if (root == null
        || (movable
            && (root.right == null
                || (rl = root.left) == null
                || rl.left == null))) {


        // 有一边可能为空,节点数太小了
        tab[index] = first.untreeify(map);
        return;
    }


    TreeNode<K,V> p = this, pl = left, pr = right, replacement;

	// 移除节点有两个子节点
    if (pl != null && pr != null) {


		// 找到后继节点
        TreeNode<K,V> s = pr, sl;
        while ((sl = s.left) != null)
            s = sl;

		// 获取后继节点的颜色
		// 后继节点变色为删除节点的颜色
		// 删除节点的颜色变为后继节点的颜色
        boolean c = s.red;
        s.red = p.red;
        p.red = c;

        // sr = 后继节点的右子节点
        // pp = 当前节点的父节点
        TreeNode<K,V> sr = s.right;
        TreeNode<K,V> pp = p.parent;

		// 如果后继节点就是删除节点的右子节点就调换后继节点与父节点的位置
        if (s == pr) {

            p.parent = s;
            s.right = p;
        }

		// 后继节点在更深处
        else {

            TreeNode<K,V> sp = s.parent;

			// 将当前节点移动到后继节点的位置
            if ((p.parent = sp) != null) {


				// 后继节点如果是左节点
                if (s == sp.left)

                	// 删除节点转移到左边
                    sp.left = p;
                else
                    sp.right = p;
            }

			// 转移后后继节点的右子节点就是删除节点的右子节点咯
            if ((s.right = pr) != null)
                pr.parent = s;
        }

		// 调整删除节点p与后继节点s的指针
        p.left = null;
        if ((p.right = sr) != null)
            sr.parent = p;
        if ((s.left = pl) != null)
            pl.parent = s;
        if ((s.parent = pp) == null)
            root = s;
        else if (p == pp.left)
            pp.left = s;
        else
            pp.right = s;
        if (sr != null)
            replacement = sr;
        else
            replacement = p;
    }

	// 删除节点只有一个左子节点
    else if (pl != null)
        replacement = pl;

	// 删除节点只有一个右子节点
    else if (pr != null)
        replacement = pr;

	// 删除节点就是叶子节点
    else
        replacement = p;

	// 删除节点位置后续还有子节点就会进入
    if (replacement != p) {


		// 真正移除删除节点并维护指针
        TreeNode<K,V> pp = replacement.parent = p.parent;
        if (pp == null)
            root = replacement;
        else if (p == pp.left)
            pp.left = replacement;
        else
            pp.right = replacement;
        p.left = p.right = p.parent = null;
    }

	// 如果删除节点是红的可以直接删除,如果是黑的需要维护树
    TreeNode<K,V> r = p.red ? root : balanceDeletion(root, replacement);

	// 没有后面节点就删掉
    if (replacement == p) {

        TreeNode<K,V> pp = p.parent;
        p.parent = null;
        if (pp != null) {

            if (p == pp.left)
                pp.left = null;
            else if (p == pp.right)
                pp.right = null;
        }
    }
    if (movable)
        moveRootToFront(tab, r);
}
对比着红黑树规则与注释来看应该没什么问题。主要就是balanceDeletion(root, replacement)这个方法的调用。
最后
到这里就把TreeNode主要的方法都看完了,还有一些边边角角的逻辑就留给大家来补了。这个红黑树的逻辑确实很绕,只看是很难学明白的,需要自己画画图,然后根据红黑树规则想想我要怎样变化才可以维护好呢?根据这个规律是否能适用在相同情况但变化不同的树结构上。


